|
|
| Разместил (Author): |
SergUA6  |
| Авторские права |
© http://www.radioscanner.ru |
|
|
Текст
|
Introduction (general conceptions)
What is the Signal Analyzer (SA) – is the software for analysis of different signals (records), SA is intended to essentially help in the solving of this difficult and very interesting task. One of the reasons for the lack of good analyst experts is the lack of good and affordable software in this field, SA solves these problems, and represents a balanced and unique set of tools for the very thorough and qualitative analysis of the signals.
The availability of good tools includes the ability to use them, in addition, the analysis is a complex task and requires an integrated approach. There are two versions of SA:
1) SA free – is a freely available program, which has some limitations. SA free is designed to explore the principles and ideas of the commercial version;
2) SA full - is the commercial version.
Both versions are running on all full-fledged Windows platforms, including Windows Vista.
SA works only with records, because only the record is a guarantee for the high-quality and effective analysis.
The main purpose of the signal analysis – is to give as much information about the signal as possible, so as to identify/classify/recognize and etc this signal. From this it follows, that the main task of analysis – is to disassemble the signal as thoroughly and for sure as possible.
A simple example. John accepts on his receiver some abuzz signal and ask himself the question:” What is that and who is it?” What are John’s options? The first and obvious option is that John writes on special forum in the hope to get an answer about this unknown signal. Who will reply to John? Only an analyst. The second option, is that John will try to identify the signal by himself. What John is going to do in the case of the second option? He runs SA on his PC and gets the result. But John isn’t an analyst, what is to be done here? It’s not a problem, analysts are not born they are become. I dare to assure a good expert analyst as well demanded as any other high-class specialist. Below we will take up basic concepts and methods of the unknown signals analysis.
Let’s define right away, analysis is the very difficult task which requires careful in-depth study of the signal, therefore, real-time analysis is not even discussing. The analyst works only with a record. The analyst may be interested only in the record, if there is no record then there is no subject of analysis. The moment you start to do analysis, you will immediately realize that a lot of people do not know how to make good recordings suitable for analysis, and this is really big problem.
In discussions with various people, I’m often asked, what is SA for while there are software like Adobe Auditions, Sound Forge, Code-300-32 and etc? Isn’t SA simplified version of these products? No it isn’t. SA is the absolutely independent tool, designed for solving specific tasks, which can’t be accomplished by any other software.
Also people often make a muddle of the signal analysis and decoding objectives. I separate these things: decoding isn’t the task of the analyst, the analyst does not write decoders, but he can suggest what decoder-demodulator is required for this specific signal. Bit-analysis is done by crypto-analytics, this is outside the scope of my interests, and questions of crypto analysis can’t be solved by SA. To put an end to the differences among SA and other software, try to answer the question without using SA: “What demodulator is needed for this signal http://signals.radioscanner.ru/base/files/signal57 /test.wav (size ~300 kb)?”
You will not answer this question without SA, because only SA gives an ability to study unknown signal accurately and finely. Of course SA can’t give an answer on all questions, but SA greatly expands abilities of the signal analysis, that’s what, in fact, SA was created for.
Installing SA on PC
System requirements for PC - OS: Windows 95/98/NT/ME/2K/XP/Vista, Screen resolution 1024 by 768 and more, RAM 128 Mb and more, CPU P-3 and higher, not less then 15Mb of free space on your HDD. Actually, the better PC configuration you have, the better work of SA, since some functions require very high computing power.
Run sa_setup.exe, and follow the installer. In general, it is a banal and familiar procedure. At the first start the program asks to enter the registration key, SA free version does not require this key and is ready for use immediately after installation.
After input of the legal key, it is necessary to restart the program. In case of successful registration, the registration window will not appear anymore. I will remind, without legal registration it is forbidden to use SA full. The further description concerns only registered versions SA full, the description covers also version SA free, but only in those parts where there are no limitations. However specially I do not select it description, in other words simply complete version will be described here.
Files with which the program works
All formats of *.wav files, which are supported by ACM subsystem. Usually its standard set:
A/mu-law wave, ACM waveform, DVI/IMA ADPCM, Microsoft ADPCM and some other, mp3 format, stereo and mono modes, RAW files in smallint(16bit) format, I/Q data both standard wav stereo file and RAW(16bit) are also supported.
The maximum size of the data, loaded in the program, is no more than 50Mb, even if the file has the size in 100Mb, no more than 50Mb will be loaded. Same as if the file of compressed data has the size 30 Mb, it will be loaded no more than 50Mb of decompressed the data.
The maximum frequency of the file discretization with which SA optimally works is 2000000 Hz. In this context Optimal work means that all values are placed in the designated fields.
Despite the fact that the list of formats is quite impressive, the most suitable format for the qualitative analysis is the standard Microsoft PCM WAV 16bit. 24 and 32 bit data are not supported yet. The reason is very simple, only this format allows to save the data in not distorted condition, all other formats distort the data to a greater or lesser power and, in general, is not suitable for the qualitative analysis.
The program never works with the source file directly, the working-copy of this file is created for the analysis(that copy will be deleted after work is done), thought it takes away resources, but guarantees integrity of an initial material and save it from various OS’s force majeure.
Description of tools and menu items of SA Full program
Main window
After SA starts the main window appears, all events and actions are occurring within the main window.
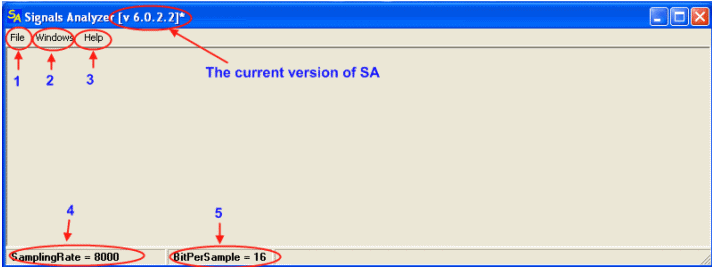
1. Menu File: contains two items - OpenFile and OpenAsData.
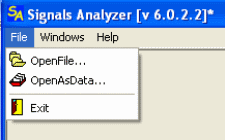
OpenFile – loads standard audio files through the standard interface. Darg-and-Drop technology is also supported, but only for *.wav and *.mp3 files. If the size of the loaded data exceeds 50Mb limit, the warning window will pop-up and further loading will stop.
OpenAsData – loads any data interpreting them as RAW date, if the size of the loaded data exceeds 50Mb limit, then warning window will pop-up and further loading will stop.
2. Menu Windows: contain one item - CloseAllWindows
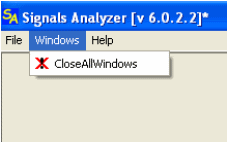
CloseAllWindows – close all opened windows in the main window, and allows to switch quickly to the analysis of a new signal, completely unloaded the results of the previous one.
3. Menu Help: contain two items Reg and About
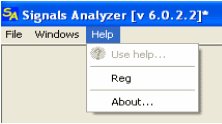
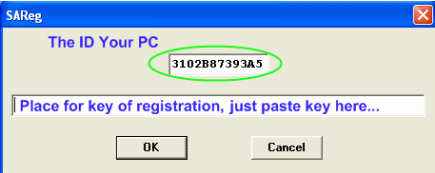
Reg: Calls the registration form through which it is possible to register the program, in case, if, by some reasons, it is not registered for you or the key suddenly became illegal. Also allows to receive computer’s ID for registration.
About: The standard picture may change in the future. In versions of SA free this window also displays the computer ID.
Use help – isn’t active, since help was decided to take out in the separate document, because of constant development of the program.
4. SamplingRate – the information field for showing frequency of discretization of the analyzable file, since it’s possible to load several files, the value is outputting for that file window, which is active, in the case of closing all working windows, then there is a last output value stays.
5. BitPerSample – the information field for showing current digit capacity of the data. Do not display real state of affairs, always shows 16bit, probably will be corrected further.
At this, the description of the elements of the main window may be considered as complete. It is important to understand that all events are occur only in the main window, this window can be scaled, its size can be changed, but thus there is cutting off of internal windows. That is, the internal area is not scaled, except the case, when the internal working window is spread in the main window completely, But thus only one working window is visually accessible to you, though there can be several of them, usually the main window spread on full screen, but sometimes it is not required.
Working windows
The main working window appears after loading of a file, this window displays the spectrum. A few general words about the organization of the window. The window has two toolbars, the upper toolbar for operative change of the spectro-analyzer settings, and the lower toolbar, where various functions what are necessary for the analysis can be called.
Spectrum’s output (sonogram) has the one feature: the zero data is output as a background of the dark blue colour, it is made specially, for this purpose, that user could see where the file was starting and where it was ending.
All other working windows are derivative of the main working, and are called from it.
Almost every function’s result creates a new window. On the one hand it is wasteful, on the other allows to solve several problems. For example: visually to compare results of different functions, visually estimate what was and what’s became, it is easy to do a step back, unnecessary windows, if you are sure that they are not necessary to you, can be close simply.
In general, from my point of view, the number of pluses are more than minuses, and if you will not bring the quantity of windows to fanatism, you won’t get any problems at least I had not ever got them.
It should be noted that generally, the main working window expands fully, because the task of seeing everything is uncommon, and implies a good knowledge and understanding of the analysis, thus it is more for experts and special occasions.
The main working window
Upper toolbar, markers and navigation
1. SizeFFT – the size of FFT block(segment), by which sonogram is forming, default size is 1024 of counting out.
2. Shear – Shift between adjacent blocks. Shift on value=Size means that blocks follow one after another without overlap the junction in the junction, value different from Size means the overlap presence, such Size/2 as the following block starts on half previous, Size/4 – on the first quarter previous etc
3. Image – sets lower dynamic range(diapason) of the sonogram, default value is 50Decibel, that means all spectrum’s components with smaller lever almost are not distinguishable.
4. WinF – window filter. Necessarily used practically in all analyzers on the basis of FFT, the window of the Kaiser with beta = 8 is used by default, that provides very good characteristics of the sonogram.
5,6. Fmin, Fmax – Fields, where lower and upper verge is indicated in hertz of the displayed sonogram.
Verges of opened file are displayed by default, in this case fields have gray color, that is, it’s not possible to make these verges wider.
If you will research some frequency fragment, or in result of some function these verges will be changed, then fields will change the color on dark blue. This made for fast orientation, if see you whole frequency spectrum or only some part of it.
7. ALC – Activates normalization by the strongest component (multiplier?) of the spectrum in the FFT block limits. Do not make an influence on the signal itself, but on the sonogram’s image.
V markers – Vertical markers: select an area of the signal by the time parameter
H markers – Horizontal markers: select an area of the signal by the frequency parameter
Both types of markers are very important components. All work under analysis connected with an active using of these markers. Markers can be moved by two methods:
1) By capturing them by the mouse (that is not always convenient, especially if it is necessary to select signal’s area)
2) By mouse moving in the area of the spectrum’s displaying, while left mouse button is pushed.
Double click of the left mouse button combines the markers, thereby, switching them off.
8. Navigation – Slider of the navigation on the spectrum. Slider moves the spectrum, if the spectrum does not fit in the display window completely.
Lower toolbar and information fields
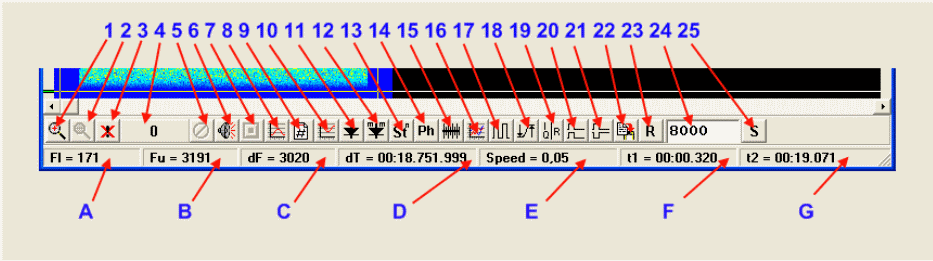
1,2,3 – Elements of the zoom control by the frequency parameter.
1- Area limited by H markers(by the frequency parameter). It Can be opened on whole window.
2- Return. Step back.
3- Full returning to initial state.
4 – Indication(visualization) of the process. Not all processes can be represented visually, but the processes, which course is displayed, can be stopped by control element 5
5 – Stop. An interruption of current process.
6,7 – Player controls.
6 – Plays the part of the record which is selected(marked) by Vertical markers
7 – Stop of playing.
Playback recordings were made exclusively for use/work with speech signals, in the general case this function is used very rarely and basically by beginners, because there are absolutely baseless illusions that signal analysis is the analysis by ear. Of course no, but, nevertheless, sometimes it is rather well to listen. Playback interrupts by call of any other function or moving Horizontal markers, SA is not a soundbox, or listen or analyze.
8 – Selection(filtration) of spectrum’s area(segment), all what stay behind the limits of H markers will be removed from the record.
9 – Removing of spectrum’s area (segment). All what is located in the rectangular area, limited by V and H markers, will be removed from the record. It is rarely necessary, but sometimes you need to. The accuracy of the temporal (time?) verges are not too large, but sufficient for the purposes of the analysis.
10 – Removing of the spectrum’s area(segment), all what located between H markers will be deleted from the record.
11 – The quadrature amplitude detector. Whole(all) record is processing. Ordinary used for getting of the clock frequency of manipulation.
12 – Modificated amplitude detector. Developed specially for getting of the clock frequency of manipulation of MFSK signals.
13 – Call of the special module for getting and researching of the signal’s harmonics. Widely applied at researches of the phase manipulation.
14 – Call of the PhasePlane module. It is necessary to select signal’s area by V and H makers before call this module.
15 – Getting of the function of autocorrelation. Requires marking of the signal’s area, for which ACF will be calculated, by V markers. The course of the process is not indicated, so no panic!
16 – Call of AOF module-approximation by the one frequency. Analogue of the frequency detector, the result of it’s work isn’t a tension (voltage?), but real frequencies. It has very high linearity and, as consequence, high accuracy, but, unfortunately, works slowly enough. It is necessary to select an area of the signal by V and H markers before call this module.
17 – Frequency detector. Classical FSK demodulator, it does demodulate till modulation’s voltage (tension). It is impossible to get bit-stream from it yet, however, it’s just a matter of time, so there will be also a bit-stream. It is necessary to select spectrum’s area(segment) for demodulation, by H markers, before call this module.
18 – Rigid amplitude limiter. Restriction is rigid thought, but not primitive. Sometimes it is needed to use.
19 – Converter from I/Q into REAL, for work with I/Q files.
20 – Direct translation(shift) of selected area(segment) of the spectrum in lower range, requires selection by H markers.
21 – Translation(shift) of the selected area of the spectrum with inversion in lower range, requires selection by H markers.
22 – Copying of the signal’s selected area(fragment) into new window, requires selection(marking) by V markers.
23 – Resampling on the frequency, which is mentioned in the field 24 (integer numbers only)
24 – Field of the the field of dual-use. Sets a new frequency for the function of resampling. Sets value and shift vector for the function of the spectrum’s shift.
25 – Shift of the spectrum on the value which is mentioned in field 24 (integer numbers only). Positive values mean upper shift by frequency, negative values mean lower shift.
A – frequency where lower H marker is located. It is not so exact value, not recommended to use for exact measurements.
B – frequency where upper H marker is located. It is not so exact value, not recommended to use for exact measurements.
C – delta between H markers. It is diapason of frequencies that is restricted by these Markers.
D – delta between V markers. It is time fragment that is restricted by V markers. Format is: MM.SS.ms.mcs. Minutes, seconds, milliseconds, microseconds.
E – speed which is corresponding to selected fragment of the time in D
F – temporary(time) position of the left V marker in the file of the record. Format is: MM.SS.ms.mcs Minutes, seconds, milliseconds, microseconds.
G – temporary(time) position of the right V marker in the file of the record. Format is: MM.SS.ms.mcs Minutes, seconds, milliseconds, microseconds.
Pop-Up menu of the main working window
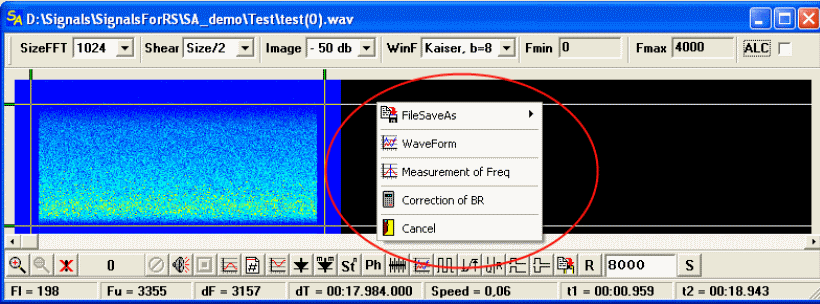
FileSaveAs – saves content of the window as a *.wav file or as RAW data
WaveForm – call of the module-viewer of the signal’s form. This is often enough used component, especially at the stage of the signal quality estimation. It is also allows to modify amplitude of the signal and to make other useful actions and measurements.
Measurement of Freq – function of measuring of the frequency by the spectrum. Requires selection of the spectrum’s area(measured frequency) by V and H markers. Precision in 0.1 Hz. That high precision, requires time and good computing resources, especially it’s notable on files with big frequency of descritization. The course of Process is not indicated, no panic! The max time of waiting ~ 5-6 sec. The result displays in the form of the small floating window

which can be moved by mouse, while left button is pushed. Right-mouse click removes the floating window. It is important that result of the last measurement is adding as a value of the clock frequency in the BR(BaudRate) field in the Phase viewer module.
Correction of BR – calls form for correction of the analyzing record to standard values.
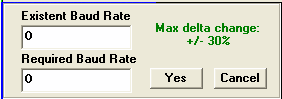
The problem is that the frequency of descritization of specific devices does not correspond to the standard or declared frequency, and then in the record instead of due 2400 hertz of frequency manipulation values like 2373, 2378 and other appears.
If you are sure that problem is in the analyzed record, it will be easy to fix this, by making call of this form for correction. Don’t use this ability if you aren’t sure that clock frequency really has an invalid value.
next...
|
|
|
|
Добавлять комментарии могут только зарегистрированные, активировавшие регистрацию и не ограниченные в доступе участники сайта!
|
| Файл создан: 17 Apr 2009 00:44, посл. исправление: 21 Apr 2009 23:46 |
|


 English version
 Versión en Español